Jeepskate's Joint
About Me
Links
Trail Run Pics
Tech Articles
Jeepskate:
Suspension
Steering
Drivetrain
Body/Interior
Jeepskate
II/XL:
Suspension
Steering
Drivetrain
Body/Interior
1 Last
7:
Suspension
Steering
Drivetrain
Body/Interior
![]()
Another YJ Tub Swap
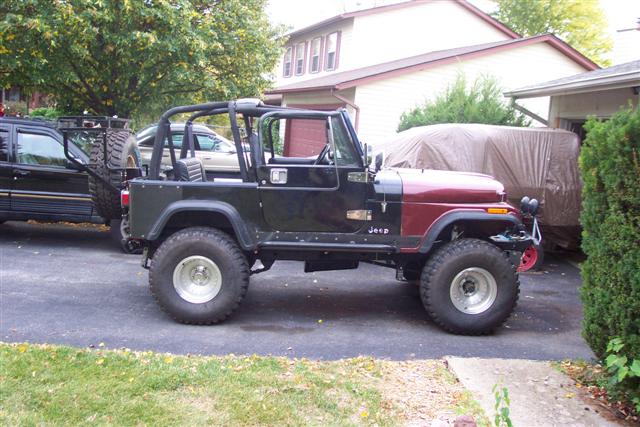
Wow! Big surprise here, huh? :-) I did another YJ tub swap, this time with a tub from a '94 YJ. The original tub had some cancer spots in various panels as well as an almost non-existent driver side floor pan and a hole in the rear floor. I had initially covered the rockers & corners with diamond plate panels and dropped a panel in the driver foot well and pretty much forgot about it until I noticed that the tub was starting to 'splay' out at the top. I did a few things differently on this one from the first one on Jeepskate. Starting up front, I kept the stock CJ front clip, no fancy grafting on this one. I also retained the CJ dash and bought a replacement CJ windshield frame from Willys-Overland, which meant setting up the tub to use the CJ defroster. I went out back with my trusty cut-off wheel and removed the defroster section of the cowl from the remains of the original tub off of Jeepskate II/XL and bolted it to the YJ cowl. I retained the roll bar from the '94 for the added back seat protection and because the previous owner had added a full cage to the front. I also retained the YJ tailgate so that I could use an Instatrunk to conceal & secure things in the back. This tub had been in an accident, so it had some light damage to the rocker panels and some fairly heavy damage to the driver side rear corner and quarter panel. I straightened everything out as best as I could with a dent puller and hammers and dollies. Rather than spend a bunch of time & effort trying to get it perfect with a bunch of bodywork, I purchased a set of heavy duty rocker guards with side steps and interior reinforcing brackets from Shrockworks, and a custom set of corner guards from Off Your Rocker which I coated with undercoating on the back side and black Hammerite on the front. The driver side corner is for a YJ, but I ordered it without the gas filler cutout. The passenger side is also for a YJ, but I ordered it with a gas filler cut-out ala CJ...this required moving the filler about 1/4" to the right to clear the lower YJ tailgate hinge. I then cut the filler hole in the tub to match. For the body mounts, I used Prothane CJ bushings along with a Standard Offroad 1" body lift (this was an afterthought due to clearance issues between my spare tire carrier and rear bumper...I hadn't planned to use a body lift on this one). On the mounts directly in front of the rear tires, I simply put a nylock nut and heavy duty washer in the body channel above the mount and bolted into that. On the rearmost mounts on the rear crossmember, I through-drilled the rear body channel at the CJ locations and through-bolted with a pair of 3" body lift pucks placed inside the rear body channel to prevent crushing. I put the original front bumper and rear bumperettes in storage and replaced them with pre-runner style units from Fly-N-Hi, replaced all of the hinges with stainless steel, and installed a pair of Warrior combo light/mirror mover brackets with YJ mirrors. I retained the original front fender flares and had intended to go back to CJ flares on the rear, but once I clamped the CJ & YJ rear flares in place to make my final decision, I decided to go YJ...they offered considerably more tire clearance without having to trim any sheetmetal. I may eventually change to Bushwacker Cut-Out flares. The Jeep will remain 'technicolor' over the winter and get sent out for paint in the spring. I'm leaning toward sticking with the black since the majority of the body and parts are already that color. I bought a used front clip to use for the repaint and will store the originals for restoration time when I'll go back to the original color. For lighting, I have a set of vintage Dick Cepek C-800's and C-1000's (the big muthas with the air vents on them) on the front bumper and a pair of Hella's on the windshield hinge mounts. I replaced the stock sealed beam headlights with some 'vintage' Cibie H4 housings fitted with new generation H4 bulbs. I bought new side markers from 4WD Hardware and put LED bulbs in them as well as the parking light housings, and replaced the tail-lights with stock replacement style LED units. The LED's draw less power and are much brighter than the original lights.
Interior
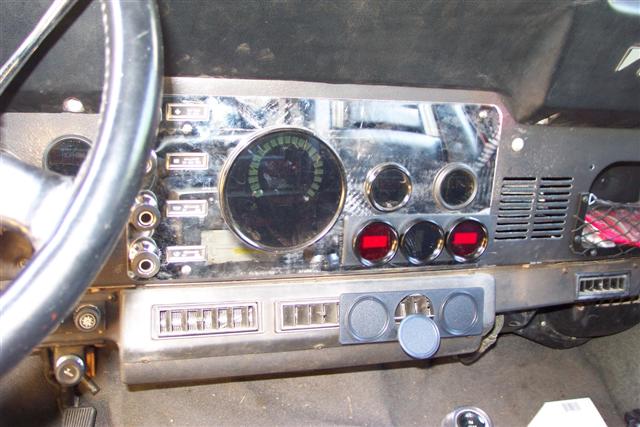
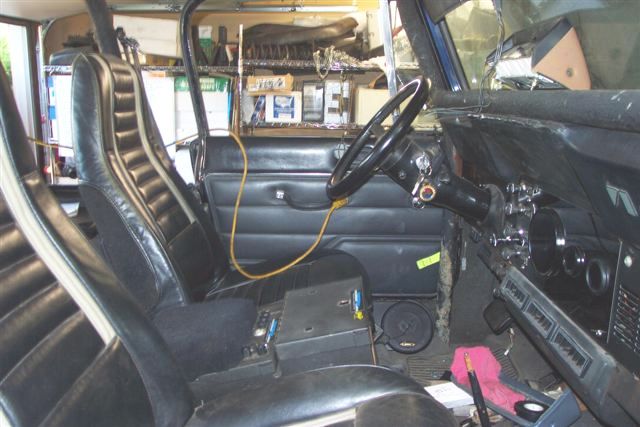
Early on I decided that I wanted to make a few strides toward restoration. In that mode, I decided to pull my original Laredo seats out of mothballs. I had pulled them shortly after buying the Jeep and replaced them with the '95 YJ seats from Jeepskate since they were in pretty bad shape. I checked with a couple of local auto upholstery shops and chose Mr. Trim which was located close to my job. I brought the seats in on my lunch break one day and we went through the vinyl samples and selected a *very* close match. The entire seating surface of the rear seat was replaced and re-stitched, and the driver side seat required some foam repair and the replacement of the center of the seat bottom as well as the outside panel of the seat bottom & back. They did an excellent job and my seats look fantastic. I used a YJ slider when I remounted the driver seat to raise it up a bit. I have a late-model YJ seat pedestal and another slider that will eventually go in on the passenger side. Since I didn't want to have a mismatched dash or repaint my original dash, I picked up a used dash off of Ebay and used a hole saw to make holes to mount the tach & clock. I then stumbled across a good deal on a set of Nordskog digital gauges and after going back & forth for a while, decided to go on and buy them and ordered up a voltmeter & clock from 4WD Hardware to go with them. I painted the dash with Rustoleum hammered black, slapped on a Kentrol stainless steel gauge cover without radio cut-out, bolted in a AE Miller plastic glove box, and bolted on a glove box net from Cargo Webs since the glove box door was useless with the front cage. I also bought new heater control cables and new switches and legends, picked up another Toyota tilt gauge, and recycled the GM rearview mirror with map lights (I have one with a temp gauge as well that I'll probably install later). While I had the heater box out, I installed a new heater core and a Blazer blower motor. I used a full YJ carpet set (including the hard to find side pieces that cover the rockers) that I picked up off of Ebay and installed an Instatrunk behind the rear seat (another Ebay deal). I also grabbed my collection of underdash AC units and combined pieces from each to make one good, solid unit. The stock tilt-column remains as well as the leather-wrapped steering wheel (swapped for one from a Wagoneer since the original had a big split in it). I also picked up a rare padded-top original center console for restore time as well as a set of rear wheelhouse pads.
I had started on replacing the previously stolen stereo system when the engine seized, so I continued with those plans. I picked up a used Masterac (remember them?) center console (along with a pair of door handle pods) for $50 off of Ebay and fabbed up a mounting panel from some smoked plexiglass that I had laying around which I then used to mount a Sony CDX-C7850 head unit in the front compartment. I mounted an AudioControl ESP-2 and EpiCenter in the rear compartment and installed the control knobs and some panel mount LED's in the lid. I also installed an Audiobahn bass line driver in the rear compartment with it's control knobs in the lid and installed an AudiControl EQQ under the back seat. I picked up a used MTX Thunder 4405 5-channel amp (bridged to 3 channels for the rear speakers & sub) and Thunder 4244 4-channel amp (bridged to 2 channels for the front speakers) off Ebay and installed them under the back seat. Up front I pulled the Jensen speakers from the original dash and bought some Select Increments Mod Pods to install them below the door openings. The Jensen's proved not to be up to the task once I got everything hooked up, so I replaced them with a JBL ProPower 506GTi component set. In the back I have a set of Alpine 6x9's in Thor Soundwedges and a Kicker Sola-Baric 10" subwoofer in the Instatrunk. I also added a 1.2 farad stiffening cap in the power line to handle musical peaks that would typically cause a momentary drain on the electrical system (the typical dimming headlights when a bass note hits phenomenon). Tame in comparison to some of the systems I put together when I was younger, but respectable. I replaced the factory battery cables & clamps with Python clamps and some 0/1 gauge cable. A 4 gauge cable feeds the amps via a distribution block that supplies two 8 gauge feeds. A 4 gauge ground cable feeds into another distribution block which supplies 8 gauge grounds for the amps. I ended up having to install a noise filter on the power wire to the head unit. I had lots of alternator whine in the system and through tracing my way from the amps forward, found that the noise was entering via the power wire. I also picked up a cheap used Sony CDX-715 10-disc changer off Ebay which is installed in the center console. I'll also be playing with the front speaker placement. Due to the rollcage, the Mod Pods are mounted rearward of where they should be which basically has them playing into the seat pedestals. I'm going to try to position them further forward. I may also eventually add a carputer to the mix for MP3's, GPS, and tweaking the forthcoming MegaSquirt EFI controller. I have already built a unit in a DIN-sized chassis and loaded it with Windows XP and purchased a vehicle grade power supply for it...just needs an LCD touchscreen to be complete. I picked up a Sony XA-300 off Ebay which is an aux input box for the Sony head unit that connects via the CD changer connections. The CD changer then connects to the XA-300 and I can toggle through the inputs on it via the head unit. The slick thing about this box is that it has a USB input. When this is connected to a PC, it installs as 'USB Speakers' and the PC can then route it's audio output down a single USB cable rather than a set of RCA cables. The plan is to mount the PC in a Tuffy overhead console that I've had in storage for a few years along with a 7" touchscreen monitor. I recently removed & sold the ESP-2 and purchased a used ESP-3 to replace it, so I'll be adding a Centra-Pod and another pair of speakers (maybe the Jensens?) up front for a center channel. I've also been playing with a couple of other processors: Wave MaxxBass and it's Precision Power derivative, Kove AX-1 (combines an Aphex Aural Exciter and Big Bottom), and just picked up a semi-rare BBE SM-4012
Yeah, it's a little blingy and I've got nothing against a mechanically sound ugly truck, but I like my stuff to look halfway decent. Plus, I want my wife to be comfortable in this Jeep as well and not have an eyesore parked in the driveway.

Stripped...
Ready to pull the old tub
off.

Cherry-picked...
Removing the old tub.
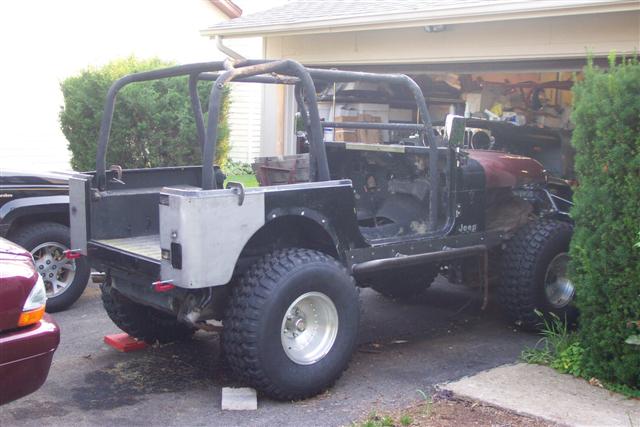
Holes no more...
The 'new' tub fitted in place with OYR
corners & Shrockworks rockers.
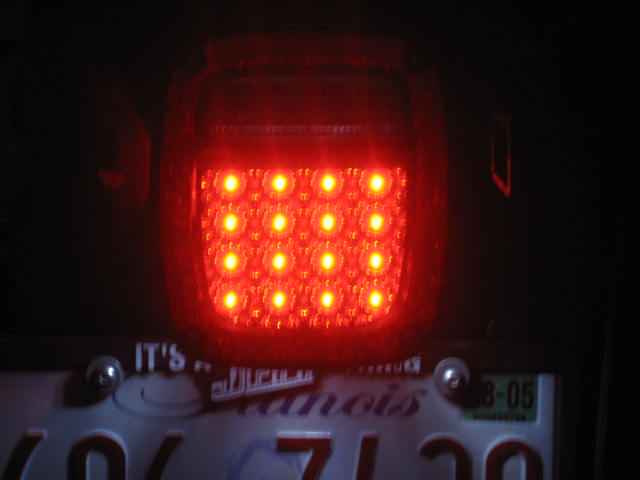
Follow the LED-er...
New stock replacement
style LED tail-lights.

Good as new...
Restored original Laredo seats.
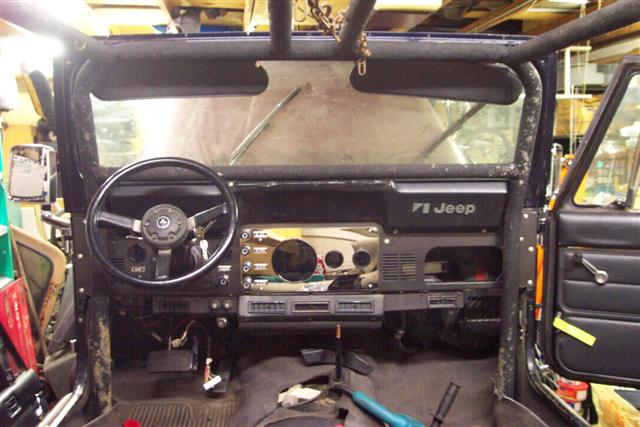
Digital age...
New dash with digital gauges.

Captured...
Glove box net to replace the door.
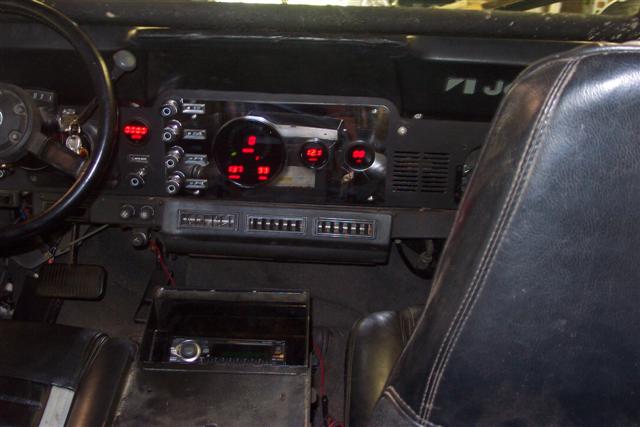
Light show...
Digital gauges in action.
Three to get ready...
Adding 3 more gauges for oil & trans
temp and air/fuel ratio.
Safe & sound...
Masterac console & Mod Pod.
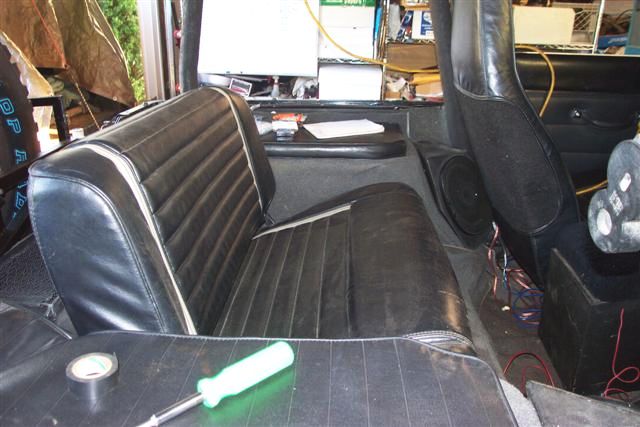
Padded cell...
Wheelhouse pads & Soundwedge.
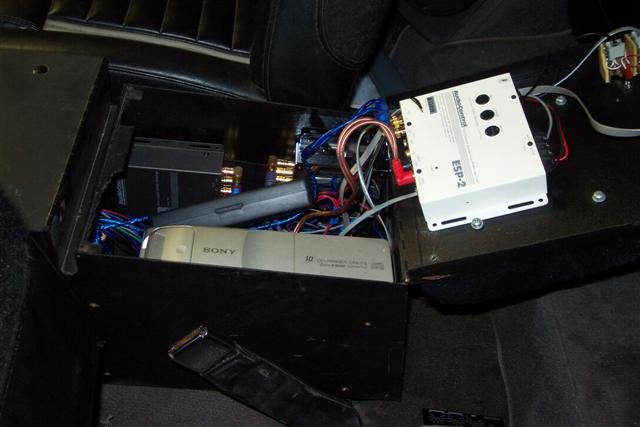
Stuffed...
Console full o' audio goodies..
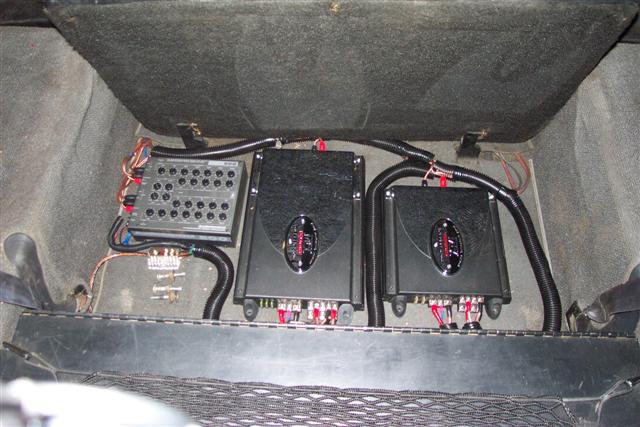
MTX Power...
Amps and EQQ under back seat.
Finished product...
Well, for now anyway...