Jeepskate's Joint
About Me
Links
Trail Run Pics
Tech Articles
Jeepskate:
Suspension
Steering
Drivetrain
Body/Interior
Jeepskate
II/XL:
Suspension
Steering
Drivetrain
Body/Interior
1 Last
7:
Suspension
Steering
Drivetrain
Body/Interior
![]()
4.0 Swap
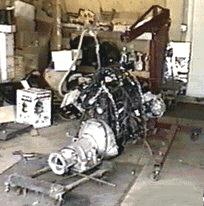
Jeepskate was originally equipped with an AMC 304 V8, T-150 3-speed trans, and Dana 20 t-case. The guy I bought it from wanted extra $$ for the drivetrain, and the 304 was seized and hadn't been run in years, so I passed on these items. I tossed around various V6 and V8 ideas and had pretty much made up my mind to go with a Magnum 360 from a Dodge Ram along with the 4-speed auto tranny. Then I stumbled across a killer deal on parts stripped from a rolled '95 Wrangler with only 920 miles on it for $2k, including a minty fresh 4.0 HO...so I'm going down that path for now, but will eventually do the Magnum 360 swap. This is a relatively simple swap as swaps go. The 4.0 block is almost identical to the 4.2 block, the T-999 auto trans has been a staple of Jeeping for many years, and the Dana 300 has the same input spline count and bolt pattern as an NP/NV 231 as well as an NP-208 and Dodge version NP-203 used behind a T-727. My 4.0 came from a '95 Wrangler, the T-999/32RH came from a '94 Wrangler (so that I'd have the provision for the 4.0's flywheel sensor), and the Dana 300 came from an '84 CJ-7. If you're doing this swap, you'll need the engine mounts from a 4.2 and the wiring harness and computer from the donor vehicle. You can use the crank sensor that comes with the Mopar 4.2 MPI kit in place of the 4.0's flywheel sensor when doing this swap (wasn't common knowledge at the time of my swap). Hoses to and from the radiator are the same as on a 4.2. You'll also need either a custom gas tank or a 15 gallon gas tank from an '88-'90 4 cylinder Wrangler (no, a newer one will NOT fit) and a complete fuel sender/pump assembly from the same or from a TJ (the TJ units are self-adjusting and are the only ones that'll let you get all of the gas out of a custom over-size tank). Custom tanks can be purchased through Trail Quest. If you cheat this by buying an "inline" pump, make sure that you use hard lines as much as possible and route the lines away from the exhaust and other heat sources or you WILL have vapor lock problems if you're not careful. I bought a new stock YJ tank and the top strap from 4WD Hardware and a used sender/pump assembly from Arnold's. It drops right into the stock CJ skid plate and bolts right up to the frame like it should. Note that the filler and return lines end up on the opposite sides of where they were on the CJ tank. A custom tank would have them located properly for a CJ. The engine dropped right in and everything bolted up fine. I ran custom fuel return and supply lines that I bent from steel tubing purchased from 4WD Hardware, and used EFI rated hose and clamps from NAPA where needed. The supply line starts with a bracket and filter from a '98 F-150 mounted to the frame crossmember just in front of the upper rear shock mounts and runs along the passenger side frame rail, across the front crossmember just below the grill, and meets up with the line from the fuel rail along the driver side frame rail. The return line makes basically a straight shot down the driver side frame rail. The factory '95 wiring harness was retained, and the PCM was mounted on the firewall just below the fuse block. Due to clearance problems with the fender, the stock air intake box was tossed and replaced with a Turbo City air tube and K&N conical filter. I may replace this later with an ARB snorkel.
32RH/T-999 Transmission
The Torqueflite T-999 automatic transmission has served as the automatic transmission for Jeep CJ's and YJ's equipped with the 4.2 engine for many years. It's considered a medium duty transmission as compared to a T-727, but is quite durable in it's own right and sports a lower first gear of 2.74. The 32RH is the logical progression of this transmission into the 90's with the introduction of the 4.0 in the the Wrangler line. The factory adapter and output shaft are compatible with both the Dana 300 and NP-231 transfer cases. I purchased this unit, a '94 model, from Olympic 4x4 Supply with about 29k miles on it for $550 including core charge. I would have liked to have gone with a T-18 or NV4500 or similar manual tranny, but I had to appease my wife who will occasionally drive the Jeep and has been very patient about the time and money that this project has involved...translation: keep the boss happy ;-) After several weeks of looking around and seeking advice, I settled on the B&M Sport Shifter which was recommended by Parts Mike. It's basically a B&M Mega Shifter without the ratcheting, and isn't available in a taller "truck" version. It's a tad short at about 11", but it works out to around the same height as the transfer case shifters after the body lift and doesn't look like it'll be a PITA to deal with when shifting.
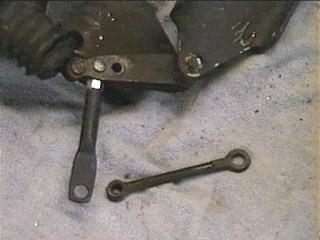
First you must disconnect the throttle linkage from the trans and remove the stock shift linkage arm. The replacement arm that comes with the shifter has a lower attachment point with a smaller diameter hole for the cable linkage. Then you remove the two transmission pan bolts from the driver side and install the supplied linkage bracket. The shifter comes with new bolts and two spacers to clear the flange on the pan. The shifter cable is then routed through this and secured with a pair of nuts and lock-washers. A supplied "nipple" is then threaded onto the end of the shifter cable. The linkage arm and shifter are then placed in "1" and the cable is adjusted in the linkage bracket via the two nuts and lock-washers until the "nipple" can be freely pushed in and out of the hole in the linkage arm. The arm and shifter are then placed in "P" and the procedure is repeated (should be very close if not dead on), and the "nipple" is left in the linkage arm and secured with a cotter pin. I don't particularly trust this setup, so I'll try to install a washer ahead of the cotter pin. From here I made a new floor plate to attach the shifter to since Wranglers have the transfer case shift lever toward the driver side which left me with a hole on that side of the plate and nowhere to bolt down the transmission shifter. I trimmed the PVC base to fit the curve of the floor, and then traced the original floor plate onto a sheet of 1/8" stainless steel and cut it out with a jig-saw (for the curves) and cut-off wheel (this stuff is so hard it went through two discs). Then I cleaned up the edges and the corners with a die-grinder, and carefully bent the plate over an old wooden box to curve it to match the floor. Also, I ended up notching the floor back about 1.5"-2" so that I could move the shifter far enough back to clear the dash without binding up the shift cable. Once I'm done cutting and drilling for the shifters, I'll polish it up and mount it re-using the foam gasket from the original plate. After 2 years of on again, off again searching, I finally located someone parting out an auto-equipped CJ-7 that had the last piece of the puzzle that I was missing...the trans mount. The same bushings as the manual trans mount are used, but the brackets are completely different. The auto requires a two-piece bracket...one 'M' shaped bracket that bolts to the trans and a flat bracket that the other bracket and the bushings attach to. I cleaned it up with paint thinner and a wire wheel and gave it a couple of coats of Rustoleum, then bolted on the bushings. I put it in place between the trans and skid plate and bolted it in...my 'eyeball' placement of the skid plate was dead on, much to my delight. I also picked up a Mopar Performance trans pan from Jeg's. It's a deeper pan that allows you to run more fluid to avoid fluid starvation (no fluid, no worky) on steep inclines and also comes equipped with a drain plug.
Dana 300 Transfer Case
The Dana 300 was a staple for Jeep CJ's from 1980-86 (the 1980 model (and I've heard some '81's too) has a slightly shorter tailhousing). This gear-driven, cast-iron cased unit with lightweight aluminum tailhousing is popular swap material for both newer and older CJ's and YJ's, and I've even heard of them being swapped into Toyota pickups and flipped for use in YJ's & TJ's. A 2.62:1 low range and 23-spline input make it a good replacement for many chain driven New Process transfer cases. I picked mine up (an '84 model) from J&M Restorations (a local retiree who builds Jeeps to keep himself busy) for $100 minus the stock shift lever shortly after purchasing Jeepskate. Since I'll either be replacing it with an Atlas II, or installing a 4:1 low gear set, I didn't bother to rebuild it at this time. I replaced the output seals, installed Spicer u-joint type yokes, and installed a twin stick shifter kit from 4-Plus Manufacturing. I ordered up a complete seal set and the Spicer yokes (PN# 248091X) from 4WD Hardware along with some bushings and small parts that I needed to install the levers. The output shaft nuts were removed and the stock yokes pulled with a generic bolt-type puller (same one I used for the steering wheel). I then pried the old seals out with a screwdriver and pressed the new ones in with a large socket. The new yokes were then installed and the nuts replaced.
The 4-Plus twin stick shifter kit re-uses many of the stock shifter parts including the original shift lever. David Oh was kind enough to send me the stock lever he had leftover from his Currie twin stick install. The shift rod bracketry is removed and replaced with two actuators (machined pieces of metal) that bolt into the rods. The shift lever that is supplied with the kit is then installed in the stock lever's location, and the stock lever is relocated to the outside of the shift lever brackets. The kit comes with a new knob with legend for the new shifter, and a replacement legend for the stock knob (I carefully pried the original legend out with a small ice pick), as well as a new dual shifter boot. I ended up having to heat and bend the stock lever to match the 4-Plus lever for better aesthetics and to keep it from rubbing on the passenger seat when flipped forward. After some discussion on Jeep-L, I decided to clock the t-case while things are still somewhat disassembled. Basically, this just involves unbolting the t-case from the trans and sliding it back far enough to clear the mounting studs, then rotating it counter-clockwise one bolt hole and re-attaching it. You end up with 5 studs holding it on instead of 6, but it's still plenty secure. This has two advantages: you gain ground clearance...the pan no longer hangs down and the lip on the skid plate can be removed; it eliminates oiling problems when flat towing...no need to disassemble the t-case and install oil-slinging paddles or stop every 100 miles. There are also kits available from Go2Guy, SRC Xtreme, Advance Adapters, Trout Industries, and others that come with a spacer ring (very useful for mating a Dana 300 to an AX-15 or AW-4) with 3 or 4 different clocking positions. I've also heard of people redrilling aftermarket tranny adapters and redrilling the Dana 300 itself. Be aware that if you're swapping this into an older CJ along with the factory skid plate that goes with it, you'll probably find that the skid plate mounting holes will not line up. I ended up with a combination of modifying the holes in the skid plate and drilling new holes in the frame in order to bolt it up.
Dana 44's
Having the obligatory narrow track Dana 30/AMC 20 combo and knowing that I'd be running SOA with at least 35 inch tires, I promptly tossed those units in the shed (amazing how difficult it is to even GIVE those axles away) and went on the hunt for something more suitable. I did some research and came across info on swapping in Dana 44's from a Scout II. Just before Christmas of '94, I located a Scout being stripped for parts and set out after the axles. The guy was kinda uncomfortable with the idea of me removing the axles, but the lure of $$ got him to agree. My buddy Karl and I hopped in his pickup and headed out to meet the guy one blustery Saturday morning only to find that 1) the guy was uneasy because the truck was parked at a gas station rather than his house and he wouldn't be able to move it once I yanked the axles, 2) the truck didn't run and had been plowed in after several snows, 3) it was sitting right over the tanks and we were going to be torching rather than wrenching. If you're counting, that's 3 strikes ;-) So, Karl calls his buddy Keith with whom he used to own a towing business and had sold out his half to. Keith informs him that he's got a '73 Blazer that he's about to pull some parts off of and haul to the junkyard, so we high tail it over there and yank the Dana 44 front and GM 12-bolt rear out from under it (have you ever seen someone dangle a Blazer chassis in mid-air with a tow truck?) and I fork over $150. At this point I was still living in a rented townhouse, and found out a few weeks later that my wife was pregnant. So, we stored the axles under Karl's deck and I started house hunting.
With the front Dana 44 I had a couple of options: hang my front springs outboard on the frame and run the axle uncut at it's 67" wheel-to-wheel width, or narrow it to fit with the springs in the stock location...I chose the latter. The "problem" when dealing with these front axles is that one of the spring pads is integral to the casting of the differential housing...on GM's it is the passenger side. Essentially, the axle housing was just shifted toward the driver side so that the passenger side spring pad was located properly. Then the driver side tube and shaft were shortened so that the ends were the same distance from the frame as the passenger side, and the driver side spring pad was removed and welded back on in the proper location. To do this, the driver side knuckle was cut free from the axle tube, the portion of the tube that was inside the knuckle was removed, and the bracket for the steering stabilizer was removed. The shock mount brackets were also removed and re-used on the rear axle. Approximately 6" was removed from the axle tube, and the axle shaft was sent out to Moser Engineering to be shortened and re-splined. The end of the axle tube was ground to a slight taper, and the knuckle was pressed back on and welded in place. New dual shock mount brackets were welded on as part of the front dual shock hoop installation. The front was refurbished as well and also received a new set of 3.73 gears to match the rear. Ford F-150 hubs and rotors were installed to "restore" the 5 on 5.5" bolt pattern, along with a set of Warn premium manual hubs and GM calipers. The knuckle-to-knuckle width is about the same as a Wrangler.
After some researching and number crunching, I decided not to use the GM 12-bolt rear since it has c-clips, is sorta weak for it's size, and would have to be narrowed. Having heard horror stories about these clips breaking and the shafts sliding out, I knew I would need to purchase a c-clip elimination kit. After talking to a few people, it was determined that this axle wasn't really worth the effort and money to utilize. Approximating the final width of my narrowed Dana 44 front (it hadn't been cut yet and was still in my garage at this point), I determined that a Dana 44 rear from a Scout II would work for me without having to go into the expense of narrowing or c-clip eliminator kits. I located one locally for $300 within a few days and had it in my possession within a couple of weeks. The spring pads were removed and relocated slightly inward and on top of the axle tubes for use with my SOA setup. The rear was refurbished (new bearings and seals) and a disc brake conversion was performed using a TSM kit and Cadillac calipers. The original 3.73 gears were inspected and re-installed along with a rebuilt Trac-Loc from a '97 TJ. Both units were topped off with stainless steel differential covers from Kentrol and coated with POR-15 just like the frame. To deal with the poor (low) breather on the rear, I installed a 1/8 NPT pipe fitting in one of the threaded holes in the axle tubes and connected a breather line that I salvaged from the 12-bolt rear.
Power 4-Wheel Disc Brakes
These are both somewhat debatable modifications, but given my situation I figured I may as well go for the gusto. I had no brake components to start with, so I bought power brakes (master cylinder, booster, bell crank) off of an '84 from Jim Middleton. The drum brakes on the Scout Dana 44 rear were trashed, so I figured for a few bucks more I'd do discs...they run cooler and are affected less by water and they just plain look cool (hey, I can't be pragmatic all of the time) ;-) Besides, with 1/2 ton axles and 35's, you want every bit of insurance you can afford to install.
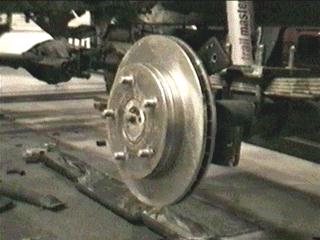
Up front I used F-150 hubs and rotors to retain a 5 on 5.5" bolt circle. I stumbled across this one while thumbing through the October 1997 issue of Four Wheeler magazine. I was just browsing and looking at the pictures and said to myself, "Self, that front axle looks an awful lot like the GM Dana 44 that you have sitting in the garage." So I went back and read the articles. The first was on a custom steering conversion for SOA and the second was on the brake swap...these were being done on a custom Dana 44 that had been built for their YJ project. Being interested in both, I called Dynatrac and Tri-County to price out the custom steering parts, but they were WAY too expensive for what they were (you could easily spend $600 buying one of their setups!!). The brake swap, however, was a different story...it appeared to use all off-the-shelf parts...of course the article was kinda vague about the details. Older 1/2 ton GM's and Fords used Dana 44 front axles, and some of the parts are interchangeable without swapping the knuckles...I believe some full-size (Wagoneer, J-series) Jeep parts are interchangeable here as well. Essentially I just used standard issue Ford F-150 rotors and hubs with the GM calipers and brackets, and topped them off with a nice set of Warn Premium locking hubs. All of the seals and bearings are the same whether you buy Chevy or Ford parts from your local auto parts store. The benefits of this are that I don't have any custom or modified parts, re-gained my 5 on 5.5" bolt pattern (the GM is 6 on 5.5"), and have internal locking hubs which are generally considered stronger than the external variety. I chose the Warn Premiums because they've been around a long time and have an excellent reputation, they're durable, they look damn good, and as a bonus the parts guy goofed-up and rang them up as the standard hubs!!
I originally set out to home-brew the rear setup, basically following the instructions for it that are in the Scout tech section at Off-Road.com. Since it required some cutting that I didn't have the proper tools for and welding which I don't know how to do or have the tools for, I farmed the task out to Pat at CL4WD since he already had the axle and was working on it. I dropped off the instructions and a set of Jeep 6-bolt caliper brackets that I purchased for the job. There were some fitment difficulties that were probably the result of me not using the exact same parts specified in the instructions (I was trying to use Jeep calipers and brackets and Ford F-150 rotors instead of Scout II parts), and also the issue of handling the outer bearing which apparently would have to be pressed off and back on anytime the rotors needed to be replaced. Pat said that he could still pull it off, but for about the same money in parts and far less labor (and therefore money) he could go with a kit from TSM which is better engineered and has a warranty. So, that is the path that was chosen. It's basically just a set of caliper brackets and spacers with nuts & bolts. The rotors are Lincoln rotors that have been drilled for this application (5 on 5.5") and the calipers are Cadillac Eldorado units with an integral parking brake that were purchased locally. I have since found out that Warn now sells caliper brackets for less money for this and other applications which use the same GM calipers and CJ rotors. I'll probably go with Warn when I do my Dana 60.
I bought a used proportioning from an '84 CJ-7 rather than trusting my crusty old '79 unit, and mounted it just rearward of the stock location so that it would be clear of the reversed front shackle. Note that you do not need to change your proportioning valve when converting from manual to power brakes. Stock lines run off of it up to the master cylinder, and custom bent pre-flared lines run to the front and rear brake hoses. I had to cut and re-flare the front passenger side for proper fit, and I used rubber GM hoses instead of stainless steel braided because I've heard several stories of the braided lines pulling apart where the ends are crimped on and unexpectedly failing since you can't see when the hose is wearing out the way you can with rubber. I installed the '84 CJ booster/master cylinder combo in the factory YJ location on the tub. I thought this setup would all work out fine, but things did not go as well as planned with this. My brake pedal came from a manual brake CJ, so I had to drill the four mounting holes in the bracket. Then once I installed it, the travel on the brake rod was such that the pedal was practically in my lap even when depressed. I modified the mounting bracket in order to relocate the pedal per a suggestion from Kurt "Duffy" Ladd (owner of the red Scrambler that's been in 4Wheel & Off-Road a lot lately), which seemed to work until I installed the brake rod. Now the brakes are actually applied when the pedal is not depressed. So, I ended up ordering an adjustable brake rod from Tri-County Gear. This turned out not to really be the solution...even at it's shortest length, the adjustable rod is the same length as the stock rod. I went on and did the modifications to the bell crank assembly to relocate it 3/4" higher on the firewall for better leverage, but because it also involved relocating the brake rod within the bell crank assembly, this did nothing to help my situation. I have a YJ brake pedal assembly on the way and still have the '95 YJ booster and master cylinder. Between those and the extra flat area on the adjustable rod which should allow me to drill a new hole for the brake pedal attachment point I should have this sorted out soon. I went on and installed a '79 Firebird master cylinder while I was at it (4 wheel disc brake model) which bolts right up to the CJ booster.
Can I Get a Lift...
The engine and tranny chained to the hoist
waiting for the t-case and installation.
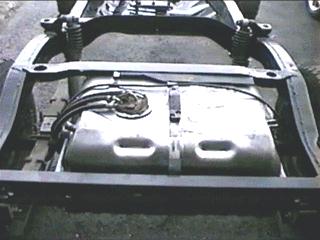
Tanks a Lot...
15 gallon pre-'91 YJ gas tank and
pump/sender.
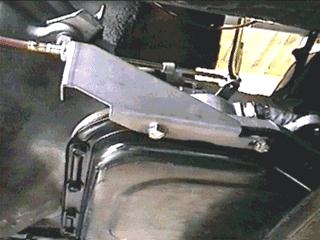
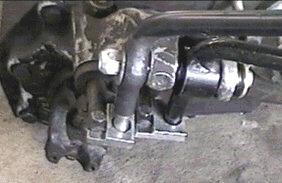
Linkage...
The new B&M shifter linkage &
bracket.
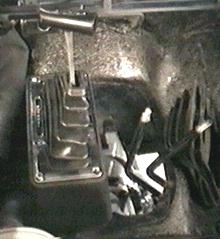
Shifty...
Positioning the B&M Sport Shifter.
Long time coming...
Finally found the elusive auto trans mounts.
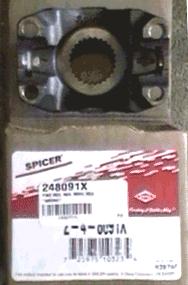
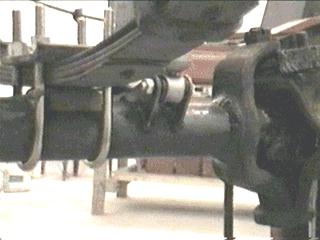
Got Yokes...
Spicer u-joint style yoke to replace the
stock strap & bolt setup.
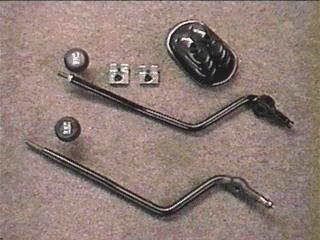
Stick Em'...
4-Plus kit at top and stock shifter &
knob with new legend at bottom.
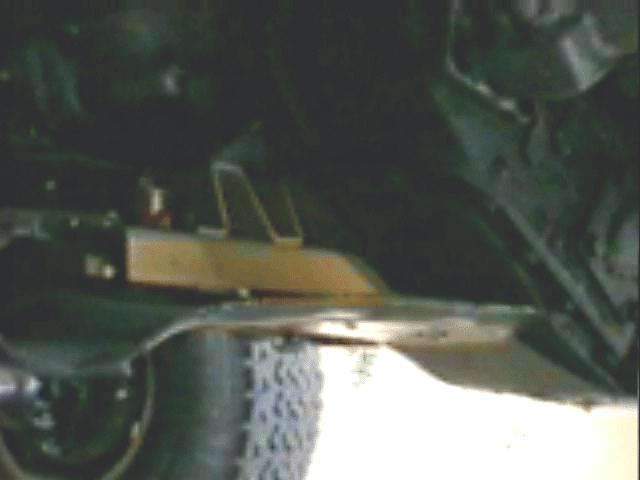
Shift Points...
Detail of the shift lever mounting and
shift rod brackets.
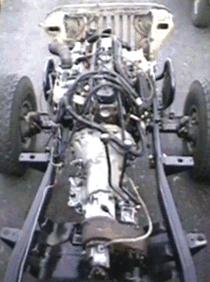
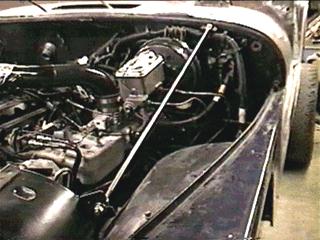
All Moved In...
Shot from the roof of the garage of the
drivetrain in place.
Chopped...
Driver side knuckle re-welded to the
shortened axle tube.
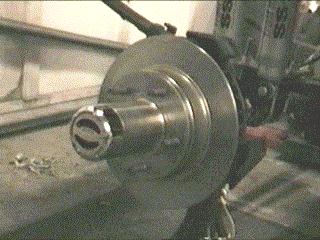
Ford? GM? Dana!!...
F-150 hub & rotor with Chevy caliper
bracket & Warn premium hubs.
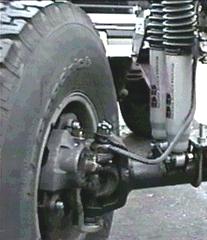
Front Caliper...
Bolted on and plumbed in with rubber hoses.
Drummed Out...
All stock brake components removed &
replaced with caliper brackets & rotors.
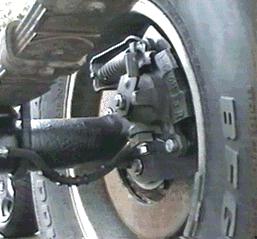
Rear Calipers...
Plumbed with rubber hoses...the spring is
part of the parking brake.
Adjustable Rod...
Installed in the new hole in the modified
bellcrank.
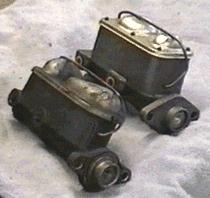
Master Plan...
CJ master cylinder (left) and Firebird
master cylinder (right).
Take Me Higher...
Relocated brake assembly.